How to Use Marvelous Designer Sims 4
Tutorial | How to make Sims 4 clothing with Marvelous Designer
I know that there have been people making these kind of tutorials already, but since I recently got a request to do so, I thought why not share my steps as well! I have to give credit to my fellow creators @serenity-cc, @sweetsorrowsims and @theslyd for some tricks and info they provided. And furthermore all other creators that helped me become the creator I am today!
For this tutorial I assume you understand the basics of Sims4Studio, Blender, Photoshop and Marvelous Designer. If not, you can find tons of basic tutorials on these subjects on sims4studio.com.
In order to make Marvelous Designer clothing you'll need:
- Marvelous Designer 5 (obviously)
- Sims 4 Studio
- Blender version 2.70 and 2.77
- Photoshop or Gimp and the needed DDS plugin (like I said, I'm not gonna go the basics of this ;) )
First thing you want to do is create your piece of clothing in Marvelous Designer. Youtube is full of videos explaining how to and it is really just a matter of practice and getting to know your way around the program.
So, as you can see in the picture below I made my mesh in MD and am ready to export it to Blender
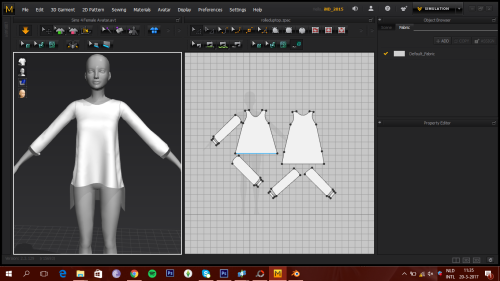
To make your mesh less poly's you need to change it from Triangles to Quads. Press CTRL+A in MD, so that it selects your whole mesh. Next you'll need to go to the menu in the bottom right corner and unfold the 'Miscellaneous' Tab, like so
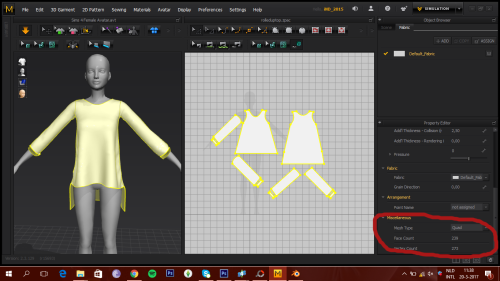
And with me it already says 'Quad' but with you it will say 'Triangle' so change it to Quad ;) You probably want to re-simulate your mesh, because there will be 'holes'
If you did this, you are ready to export your mesh as an OBJ file. To do this you need to go to 'File -> Export -> OBJ' Like this:
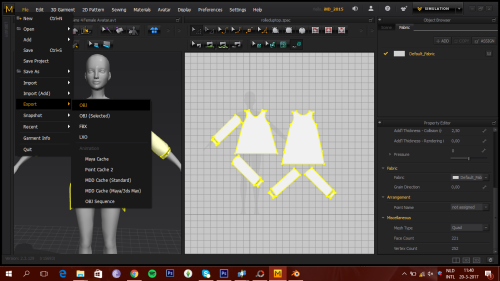
It will ask you to save, so do as you like. This screen will open, make sure to check the same settings as I did:
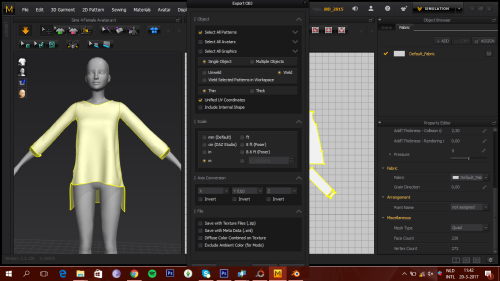
If you did this, click OK and your mesh is exported.
Next, you want to open up Blender 2.70 and open a nude top mesh exported from sims4studio, like so:
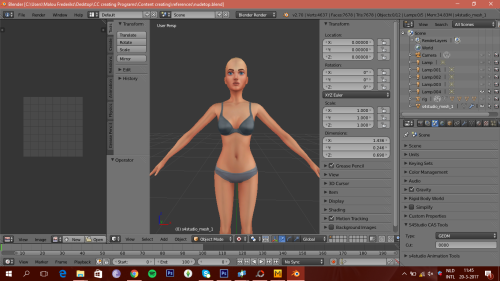
Next, you want to import your MD mesh, in order to do that you want to go to 'File -> Import -> Wavefront (obj)'
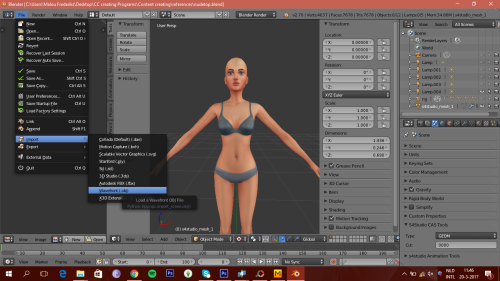
It'll ask you to select your .obj, so click that and press 'Select'
And here it is:
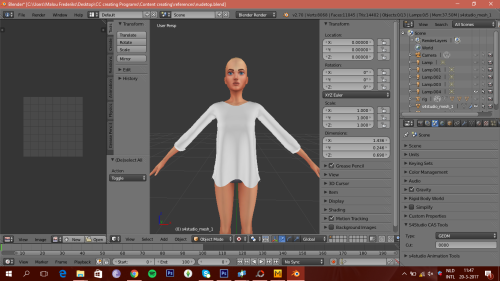
The next thing I always do, is delete the nude top parts that are covered by the top, which I don't need. Be sure to not delete too much, because it will look weird if body parts are missing ;)
Select your nude top mesh and go into edit mode. Click the button I point out with red, so that it shows all vertices on the mesh
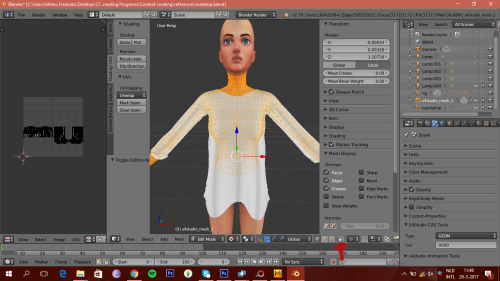
Deselect all and by pressing B or C remove the unwanted vertices. I'm left with this:
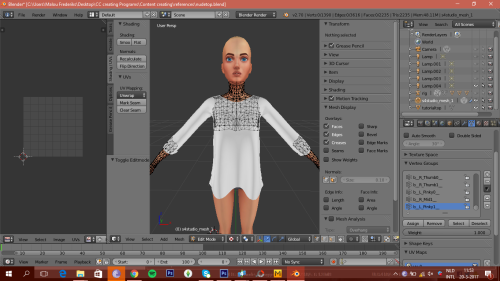
Go back to 'Object Mode' and select your top mesh. Go into 'Edit Mode' and under the Triangle tab on your right you want to change 'UV-map' into 'uv_0′.
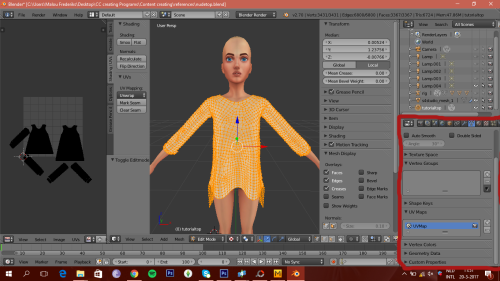
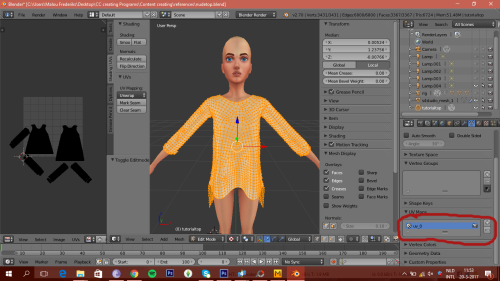
Go back to Object Mode and click on your nude top mesh. Hold shift and also click your top mesh. Make sure to select the nude top mesh first though. Then you wanna put your mouse in the middle part where the mesh is and you want to press CTRL+J, which will Join your meshes together.
Then we're gonna unwrap our uv_0. To do this you want to use the left screen. Select your whole mesh and it'll show up on the left like in the picture above. Click 'Image -> Open Image' and open up a female template which can be found here.
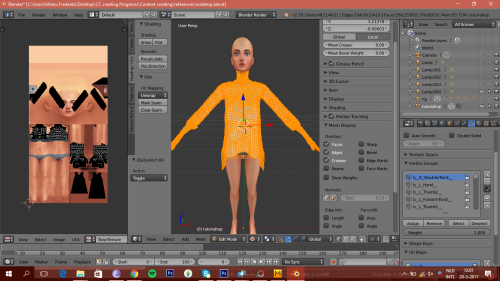
Select your top mesh and resize it by using S, X and Y. Play around with it until your mesh is less 'deformed'. Then you wanna place it in the spots you like. Please note that you can only place your mesh parts in the free top area (so not on top of the body mesh parts) And in the extra space in the bottom right. Placing it in the extra space will probably cause conflicts with other pieces of clothing in game, but this is almost unavoidable unfortunately. This is what I ended up with uv-mapping:
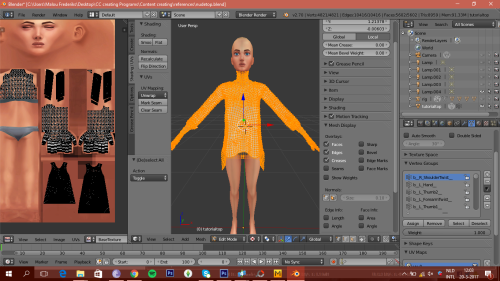
As you can see I put the top in the extra section and the sleeves in the arm part. Because you deleted parts of the nude top before, this is coming in handy to put your mesh parts there. Now don't make the mesh parts on your uv-map too small, because this will later cause your texture to be blurred.
Now that we did this, we can go back to 'Object Mode' and save our project.
Next thing we're gonna do, is find our Reference Mesh to transfer data from. We NEED to transfer data, because if we don't our mesh won't work with the morphs! Pick a EA mesh, or any custom content mesh that you think looks similar and export the blender file from sims4studio.
Open up Blender 2.77 or higher and open up your own top.
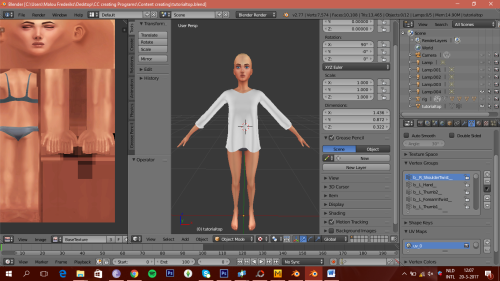
Then you want to go to 'File -> Append' and it will open up a screen to select your preferred reference mesh. You only wanna append the s4_studio mesh:
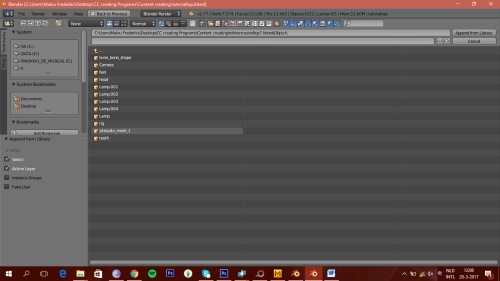
Delete the extra rig and bone bone shape it opened up. This is not necessary but I always do it :P Select the reference mesh and go into edit mode. You want to subdivide this mesh for as many times as your computer can take (if it 'crashes' just go less far the second time) this will make the mesh higher poly, which will make the data transfer a lot smoother!
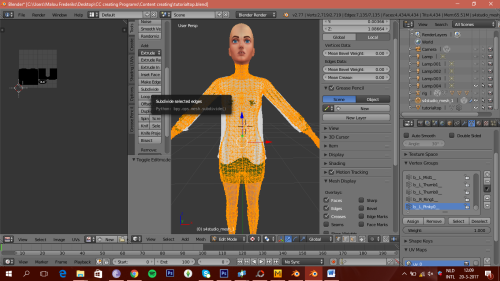
Then go back to Object Mode and select your top mesh. Select the Wrench tab on the bottom right box and click 'Add Modifier -> Data Transfer'
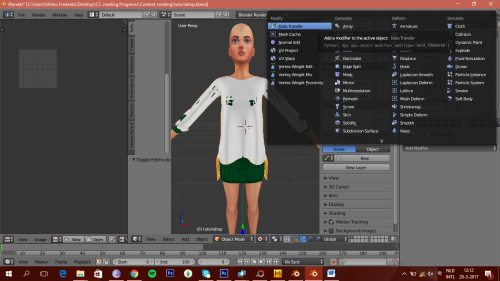
This screen will pop up:
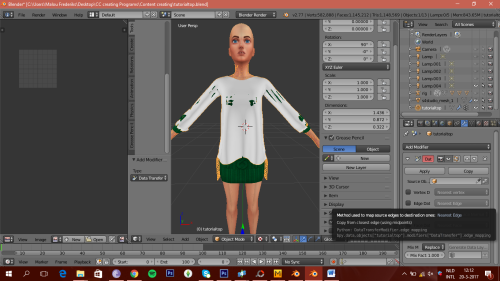
Where it says 'Source Object' you want to select your s4_studio mesh. Then, tick the box that says 'Face Corner Data Transfer' and it will give you some extra options :
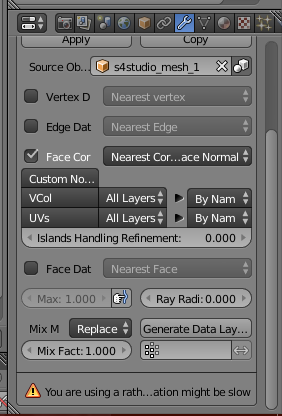
Next to the 'Face Corner Data Transfer' there is another box. You want to select 'Nearest Face Interpolated' You can play around with these settings, but this works the best for me. 'Click the box that says 'UVs' and it'll probably have to think for a while ;) When it's done, click the 'All Layers' box and select 'uv_1′
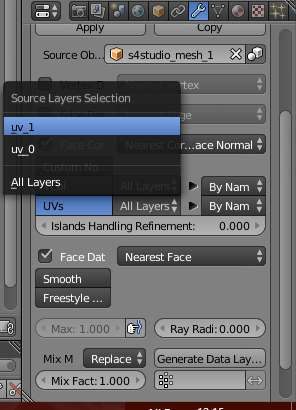
Then on the box that says 'By Name' you also want to select 'uv_1′
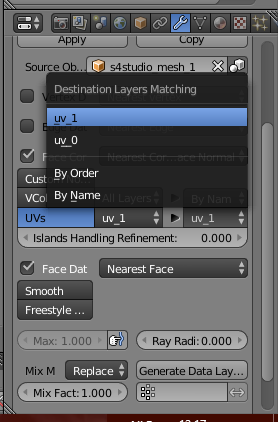
Once you did this, you mesh might turn partly black, this should be fine. If it doesn't happen, it's also fine. Click apply and you're done transfering data. Now, you can resize 'uv_1′ but I never did that and I find it very difficult. My meshes work fine without it. If you choose to do this, you can find how to here
Delete the reference mesh, save your top and close Blender 2.77.
Re-open Blender 2.70 and open up your top. Now we are going to do the 'vertex paint' and 'weight transfer' As many might say to use a similar mesh for your weight transfer, I was recently given the tip to just use the nude top/bottom as a reference to transfer weights. Often this works a lot smoother than a similar mesh ! I'm not going to explain the process of vertex paint and weight transfer because there are good tutorials on this.
Vertex Paint Tutorial
Weight Transfer Tutorial
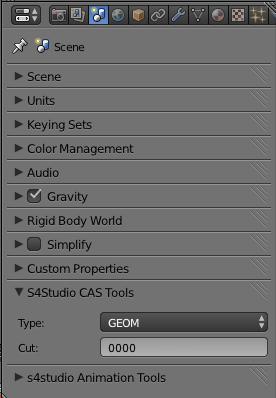
Once you've done this, your mesh is almost ready for sims4studio. The only things left to do are 'baking' your uv_map and changing one more setting. The setting you'll need to change, is the 'S4 studio CAS tools' tab. Go to the Cilinder and Ball tab on the right and you will see this:
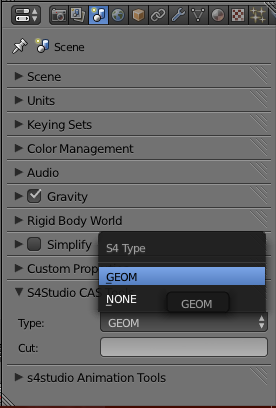
Click 'GEOM' and change 'Cut' to '0000′
Next, you want to bake your uv_map. @theslyd made a great tutorial how to do this, which you can find here.
After baking, there's one more optional thing you can do, to make your mesh appear not see through when you scroll around your model. The easy fix for this, is selecting your mesh, going into edit mode. Then you want to select all of your top mesh (so not the body parts) by clicking a small piece of the top and then pressing CTRL+L, which will select all of your mesh. Press SHIFT+D, which will duplicate your mesh, don't move your mouse, press enter. Then press space, this bar will pop up, and you want to type in 'Flip Normals'.
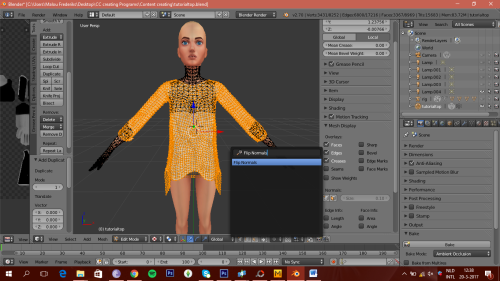
Hit enter and deselect all and go back to Object Mode. Now your mesh appears 'thick'
Once you've done all of those steps, save your mesh and open up a mesh in sims4studio to import your own mesh into. I always like to use a bikini or something, because they have the same amount of group numbers, and your mesh will import into that nicely.
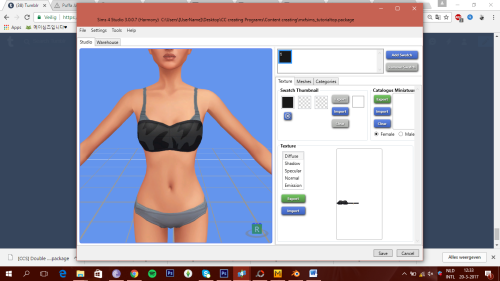
I picked this one. Go to the 'Meshes' tab and select 'Import' Select your mesh and it will import it into sims4studio. This might take a while, so wait patiently.
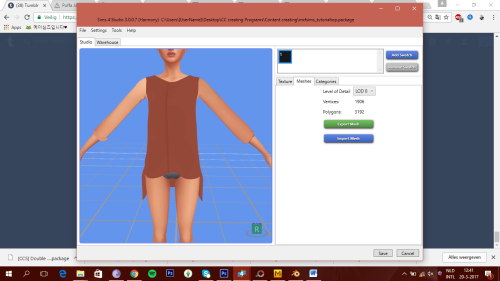
As you can see, the mesh looks weird, because there's no texture yet. That's why you baked your mesh, so it'll be easier to make a texture.
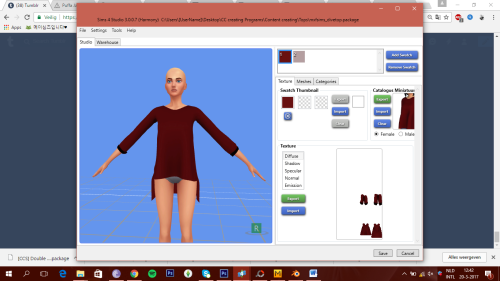
Import your texture in the 'Diffuse' Tab and your mesh will look a lot better.
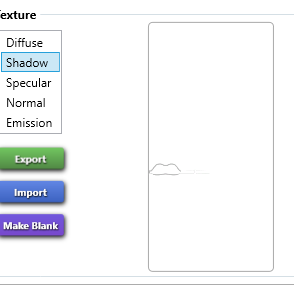
The last step you want to take, is edit or empty your Specular, Shadow and Normal map. I always empty them, because editing isn't my thing, but if you choose to edit them, you can find tutorials on that here:
Specular Map
Shadow Map
Normal Map
Sims4studio added this really handy option, where you can just make it blank by pressing it.
Before I forget, there's another final step you need to do, which will show the mesh for people playing on lower settings. Go back to the 'Meshes' Tab and select LOD_1
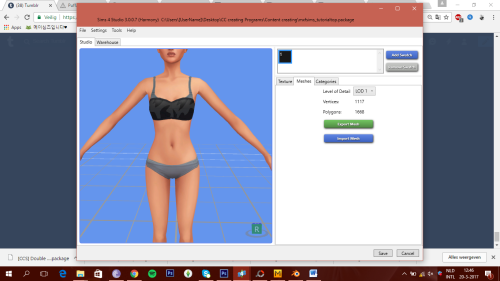
As you can see, the bikini mesh is still there. You want to go to Blender and in Object Mode, you want to go to the Wrench Tab again. Click 'Add Modifier' and select 'Decimate'. This will bring your polycount down, so that you can import it for lower settings.
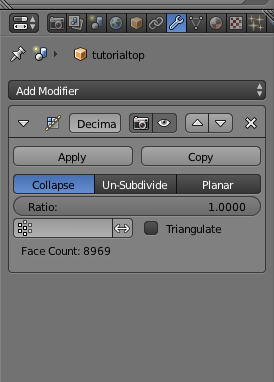
You want to click inside the 'Ratio' bar and slowly bring it down a bit, you will notice your mesh starting to deform. Don't bring it down too far already, because there are 3 LOD's tabs. LOD_0 is your undecimated mesh, LOD_1 is slightly decimated, so forth.. You want to make a save file everytime you decimated your mesh a bit more.
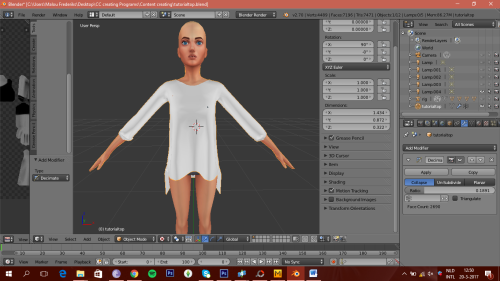
As you can see , holes will appear in the mesh once you get to decimating.
Import all three LOD's into sims4studio and hit the save button. Put your .package file into your mods folder and test your top in game. Try using the sliders to see if everything works and if it does, go make your texture, previews and thumbnail and you've made your very own Marvelous Designer Clothing piece.
I really hope this tutorial was helpfull and if not, or if something's unclear, you can at any time message me for help. I hope I didn't forget any steps, since I can be very all over the place haha. Again big thank you to all other creators who make tutorials, your tips and tricks are amazing!
Thank you for your attention and I enjoyed making this!
Malou out
How to Use Marvelous Designer Sims 4
Source: https://mxfsims.tumblr.com/post/158624704802/tutorial-how-to-make-sims-4-clothing-with
0 Response to "How to Use Marvelous Designer Sims 4"
Enregistrer un commentaire